Origins Counter Tops
Jump to Origins Fab & Install
Origins Counter Top Applications: Origins is 100% High-Density Polyethylene and is 100% Post-Consumer Recycled unless otherwise noted. Environmental attributes and unique organic color patterns make Origins a popular choice for countertop applications. As polyethylene, Origins requires special adhesives and is softer than thermoset resins (such as conventional solid surface or high-pressure plastic laminate materials).
As Plastic Laminate: 1/8 inch thick Origins panels require a suitable substrate to span distances between supports, typically a ¾” thick wood product. Abrade the side of the Origins panel to which adhesive will be applied with 40 to 60 grit sandpaper to ensure adhesion. Caution: Failure to sand may result in delamination later. Use regular plastic laminate cutting tools to trim and shape the edges. One advantage of 1/8″ Origins material, which is thicker than the more common HPL, is the ability to add robust edge details, such as a radius or bevel.
Edge Treatments: The front edge of an Origins solid surface countertop can be shaped to any profile as soon as the top is cut to size and the saw marks are router trimmed off.
Edge Build-up: By laminating several layers of thinner material together for the front edge, a countertop can be made to appear thicker than it really is at possibly a lower cost. An analysis of local labor and adhesive costs for building up an edge should be weighed against purchasing a full-thickness panel. Origins material in ¾” to 2″ thick may not require a built-up edge. The width of the built-up material should be at least 2″ wide. Only 3M DP8005 or Locktite 454 w/primer will work as adhesives for this kind of fabrication. Mechanical fasteners (such as screws) should be used in addition. A built-up edge is suitable for a variety of edge profiles. Complex edges are more appropriate to thick panels but can also be achieved in a built-up edge. Additional planning, material, and adhesive will be required.
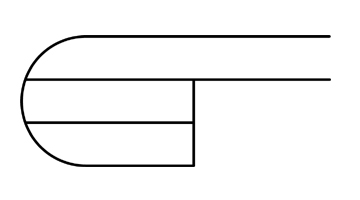
Built Up Edge
Back Splash: To prevent spilled liquids from coming into contact with the walls of a building, it is important to have a water-proof seal at the intersection of the backsplash and the countertop. The recommended adhesive for sealing the joint between the backsplash and the top is 3M-DP8005. A silicone sealer does not adhere to polyethylene and will not provide a chemical bond type of seal. Silicone sealer, though inferior to a chemical bond, will act as a gasket.
In all cases, mechanical fasteners should be used such as stainless steel screws (on the underside) to hold the backsplash to the top. Backsplashes can be any height and a different thickness than the countertop. Scribing the build-up on the backside may be used for fitting against uneven walls. The backsplash can have a radius front edge and/or a cove molding added to the intersection of the backsplash and the countertop using 3M-DP8005 adhesive.
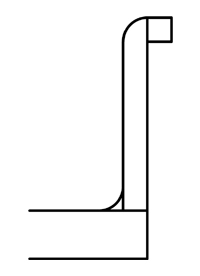
Backsplash
Maintenance and Repair: Other than occasional cleaning with soap and water, very little maintenance is required for an Origins countertop. Abrasive cleaners and cleaning pads should be avoided. Food preparation such as cutting should be on a cutting board and a trivet or hot pad should be utilized for hot containers. The surface should be kept free of abrasive materials such as sugar, salt, and sand. Avoid sliding heavy appliances across the countertop. These should have rubber feet or other protection for the surface.
Origins is embossed with a very slight texture at the factory to minimize minor scratching, however, usage will eventually cause some scratches to develop. Noticeable but minor scratches can be healed by carefully applying heat lightly to only the scratch. Caution: if not done properly, serious damage can result. Some scratches may be partially healed by applying pressure with a hard, smooth object such as a spoon and rubbing with the direction of the scratch. A scratch can be removed by sanding, however, the entire top surface of the counter would need the same amount of sanding to match. Coatings such as silicone or floor sealer may work for hiding minor scratches. A test should always be conducted on a thoroughly clean surface before applying these materials. See Origins Fab & Install for additional repair information.
Characteristics: Origins is manufactured in thicknesses ranging from 1/8″ (the thinnest) up to 2″ and in common panel sizes of 48″ x 96″, 60″ x 120″ and 56″ x 146″. At 1/8″ thick, it is suitable for use as a plastic laminate. Origins can also be used as a solid surface material, typically at ½” or thicker. Origins panels are embossed with a slight texture to inhibit minor scratching.
Solid Surface: An Origins solid surface panel offers a designer the opportunity to explore creative or complex edge possibilities, such as a convex overhanging curve or a wavy edge with several small overhanging curves. When Origins is used as a stand-alone, solid surface material of ½” or thicker, an adequate support structure will be required, unless applied over a substrate. For ½” material, supports should be at least every 12″ in each direction, for ¾” material, every 18″ in each direction, with 1″ thick material supported every 24″ in each direction.
All countertops should be continuously supported along any adjoining walls. The front edge of any countertop should be adequately supported for its anticipated usage. For example, in a college restroom, a 1″ thick x 12′ long vanity top might require a ¼” thick x 2″ x 3″ galvanized steel angle hidden behind the decorative/structural front apron to support the weight of several students sitting on it.
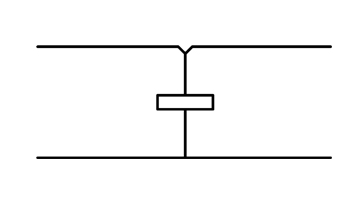
Drip Groove: The purpose of the drip groove is to keep liquid from rolling over the front edge of the top and then following the underside of the top to the point where it intersects with the cabinets underneath, thereby damaging them. A drip groove is recommended for both a built-up edge and for solid surface countertops. The groove is cut into the underside of the top, about 1/8″ wide and 1/8″ deep, and is positioned so that it will be ½” to 1″ forward of the cabinets after the countertop is installed. Although a built-up edge may eliminate the need for a Drip Groove, since the cabinets would sit behind the built-up portion, it is still recommended since a major liquid spill may be able to go over the edge and run under.

Drip Groove
No Drip Edge: A typical plastic laminate post-formed top has a rise or bump at the front edge to prevent liquids from going over the edge. This same result can be achieved on Origins material using a different method. To accomplish the rise at the front, a strip of material will need to be added, similar to a built-up edge. A rabbet or step must be cut into the front top edge about ¼” deep and 2″ wide. The second piece of material must be cut and shaped before adhering it into the rabbet or step with 3M-DP8005. Pictured is a section drawing for a no-drip, built-up edge. A Drip Groove is also recommended as a precaution.
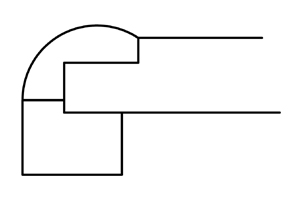
No Drip Edge
Seams: When a countertop is longer than 12 feet (exceeding the dimensions of available panel sizes), a seam will be required. As is the case with high-pressure plastic laminate, it is not possible to hide seams. It is recommended that the seam is joined with a groove and spline. Due to the possibility of a thickness variation in the Origins material, grooves should be indexed or measured from the top surface. A good alignment of the top surfaces may be achieved using wood or plastic “biscuits”. A continuous plastic spline will provide better moisture resistance than wood. For either method, 3M-DP8005 adhesive should be used on all surfaces of the joint before final assembly.
Countertops can be joined using hardware known as a tight-joint fastener. These are set into grooves made on the underside of the countertop, this hardware leaves the underside of the counter smooth with nothing protruding beneath to interfere with cabinets below. Another method is to fasten blocks to either side of the joint on the underside of the top and then pull the blocks together with a nut and bolt to make a tight joint. If a clear silicone sealer is used as a gasket material (instead of the recommended adhesive), it should be applied before the tops are pulled together. A slight bevel is recommended on either side of two joined tops at the seam. The beveled area can also be filled with 3M-DP8005 adhesive (careful masking the surface beforehand is strongly recommended) but never instead of adhering the entire joint as described above.
Please contact us if you need further information or help with a specific application.